WHEEL MOTION
This tutorial is based on the assumption that you are at almost right angles to the automobile, looking straight at the side. I will do a much more complicated tutorial on how to create the same effect on a car that is at an angle to you, at a later date.
Okay, so you have taken the perfect picture in GT4 and gotten the car and background blurred as you desired. The problem is, is that it looks like the wheels are all but motionless. After all, the car ads show the car in perfect clarity but with rapidly spinning wheels. Right?
Well, since you don't have a camera car to follow alongside of the car in question, going the same speed, I will show you a REALLY simple way to get the same effect in just seconds in Photoshop.
One thing that I need to point out about all of my tutorials, is that I am a PC Photoshop power-user. That means I use a LOT of shortcut keys to speed up the work flow. I will make note of them when they are used so that, if nothing else, you will learn a few of them by the end of the tutorial. :)
1) Let's start with our unaltered image below. I have made it in to a link so you can copy it to your system if you wish.
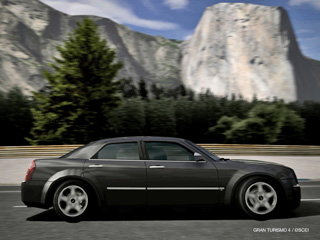
2) Start off by zooming in on the first of the two wheels.
- Press the "z" key on the keyboard to choose the ZOOM tool.
- Drag the marquee around the wheel well and release. We want to make it almost full screen so that it will be easier to select the parts we want.
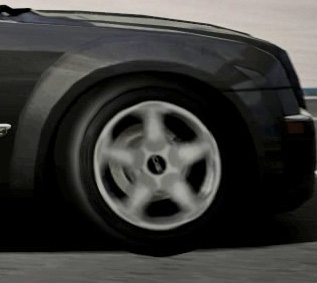
3) Now we need to select just the wheel and tire of the car.
- Press the "m" key on the keyboard. This will bring up either the circular or square marquee tool. If it is the square one, you can hold town the "shift" key and press "m" again to toggle between the two.
- Place your cursor as close to the center of the wheel as you can. If it helps, you can press the "CAPS LOCK" key in order to change your current view to the Precise Selection option (a small "+"). This can help when making fine seletions. Pressing the "CAPS LOCK" key again will return your tool view to normal.
- While holding down the "SHIFT + ALT" keys, drag towards the outside of the tire. This will constrain the marquee to start from the center point, and to a perfect circle. If the marquee is a little off, you can use the ARROW keys to nudge it in the proper direction.
- Release when it is covering the entire tire and as close to where the tire meets the road as possible. Be careful not to inadvertently select any of the background or unwanted parts of the car.
- If the marquee is too large or too small, you may need to redraw it a few times.
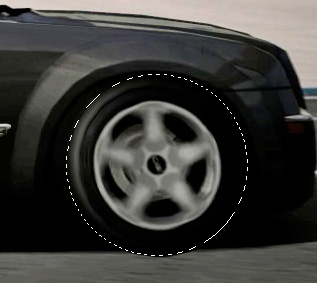
4) Now that we have our selection, we can apply the proper motion blur.
- From the FILTERS menu, choose BLUR > RADIAL BLUR ...
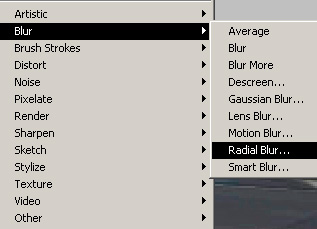
... which brings up the window below.
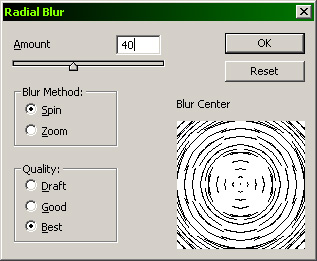
- Set the BLUR METHOD to Spin and the QUALITY to Best.
- Choose an amount that fits the rest of the picture. If you add to much, the motion in the wheels will just look wrong and make the entire picture "feel" strange.
- For this example, I am choosing a setting of 40.
- Press "OK".
- If the results are satisfactory, press "CTL+d" to "drop" the marquee. If they are not high enough, or to high (too little or too much rotation blur), press "CTL+z" to undo the last filter, and follow the steps in part 4 again till you get the results you desire.
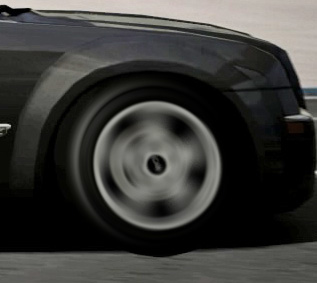
5) Once you are satisfied with the results, select the other tire with the marquee as in step 3.
- Once your marquee is in place, you only need to press "CTL+f" to re-run the last filter.
- Once again, press "CTL+d" to "drop" the marquee.
Now if you like, you could change things up a bit and have the drive wheels, the ones pushing/pulling the car, spin faster to give the effect of a burnout or loss of traction. It is all up to you.
Here is the completed "after" picture with both wheels done at the same amount. Before and After.

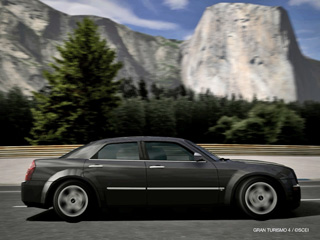
I hope that this has been helpful to you, and that it will make your shots all the more exciting. Good luck and happy Photoshopping!
-= Vicious =- VP


